How to Propagate Houseplants: Tips for Success with Any Plant
Houseplant propagation is the process of creating new plants from an existing one. It’s a simple and rewarding practice that allows plant lovers to expand their green collection without the need to buy more plants.
By propagating your favorite plants, you can expand your collection, save money, and even share the joy of greenery with friends and family. Whether you’re a beginner or an experienced plant parent, propagation deepens your understanding of plant growth and care.
Table of Contents
Basic Plant Anatomy for Propagation
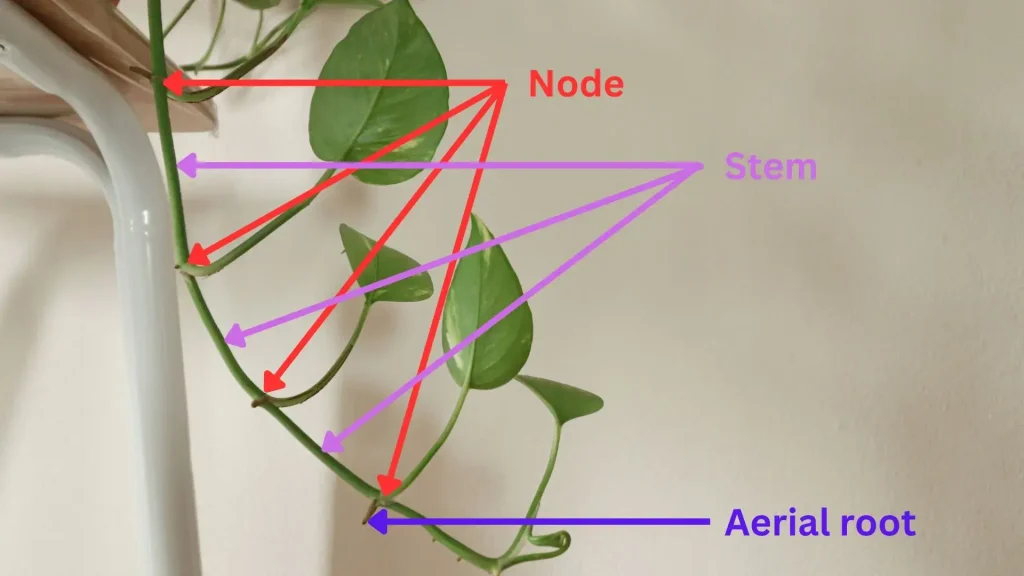
To propagate successfully, it’s essential to understand the basic anatomy of a plant and how its parts contribute to growth:
- Roots: Anchor the plant and absorb water and nutrients from the soil. Healthy roots are crucial for supporting new growth.
- Stems: Transport water and nutrients while serving as the foundation for leaves and buds. Many plants can be propagated from stem cuttings.
- Nodes: These are small bumps or joints on the stem where new roots or leaves emerge. Identifying and cutting near nodes is vital for successful propagation.
- Aerial Root: These roots grow above the soil, emerging from the stems or vines of the plant and serving several essential functions for its growth and survival.
- Leaves: For some plants, leaves can be propagated directly, especially succulents like echeveria and jade. Leaves are also essential for photosynthesis, which powers growth.
- Cuttings: Refers to the pieces of a plant—whether stem, leaf, or root—that are removed to grow new plants.
The Importance of Healthy Growth Points
Healthy growth points, such as nodes, roots, or buds, are where new plants develop. These areas are rich in cells capable of regenerating roots and stems, making them the starting point for successful propagation. Selecting healthy, disease-free parts of a plant ensures your new growth will be strong and robust.
Types of Propagation Media (Soil vs. Water)
The choice between soil and water as a propagation medium depends on the plant type and the gardener’s preference.
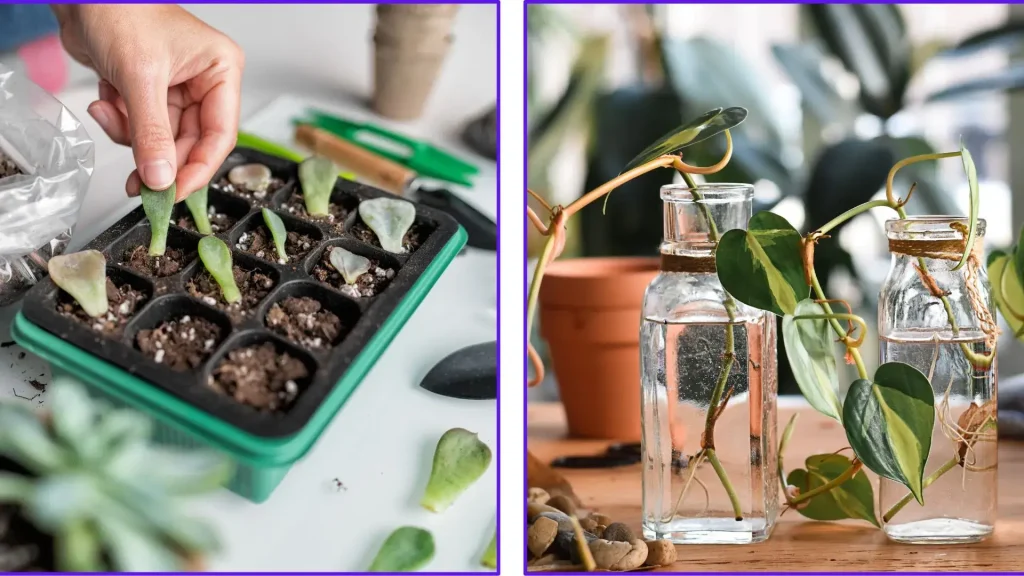
Soil Propagation
Soil provides a stable medium that mimics the plant’s natural growing environment. It promotes robust root systems suited for transitioning to permanent pots.
Benefits:
- Encourages root adaptation to soil early on.
- Minimizes transplant shock compared to water propagation.
Challenges:
- Harder to monitor root growth visually.
- Requires consistent moisture without overwatering.
Water Propagation
Cuttings are placed in a water-filled container, where roots develop visibly before transitioning to soil.
Advantages:
- Easy to monitor root development.
- Suitable for beginners due to simplicity.
Potential Risks:
- Roots grown in water may struggle to adapt to soil.
- Standing water can encourage bacteria or algae growth.
Transitioning to Soil: Gradually introduce rooted cuttings to soil by planting them in moist, well-draining potting mix and keeping humidity levels high during the transition period.
Choosing the Right Medium
- Use soil for plants that dislike excessive moisture, such as succulents and cacti.
- Use water for fast-rooting plants like pothos and philodendrons or when visual monitoring is helpful.
Use our printable propagation tracker planner to monitor your propagation success.
Methods of Plant Propagation
Propagation methods vary depending on the type of plant and its growth habits. Each method has its own techniques and benefits, allowing you to experiment with what works best for your collection.
Stem Cuttings
This is one of the most popular methods of propagation. It involves cutting a healthy piece of a plant’s stem, usually just below a node, and placing it in water, soil, or another rooting medium.
- Best Plants for Stem Cuttings: Pothos, philodendrons, monstera, and herbs like basil.
- Steps:
- Use clean, sharp scissors to cut a section of the stem with at least two nodes.
- Remove leaves from the lower node to expose the area for root growth.
- Place the cutting in water or moist soil and keep it in bright, indirect light.
- Monitor for root development over the next few weeks.
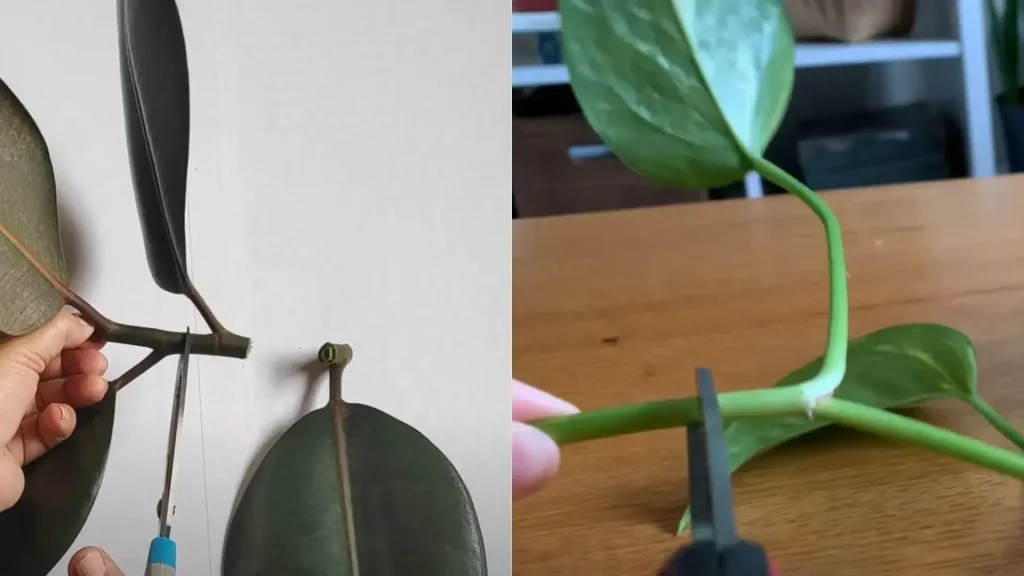
Leaf Cuttings
This method uses individual leaves to grow new plants.
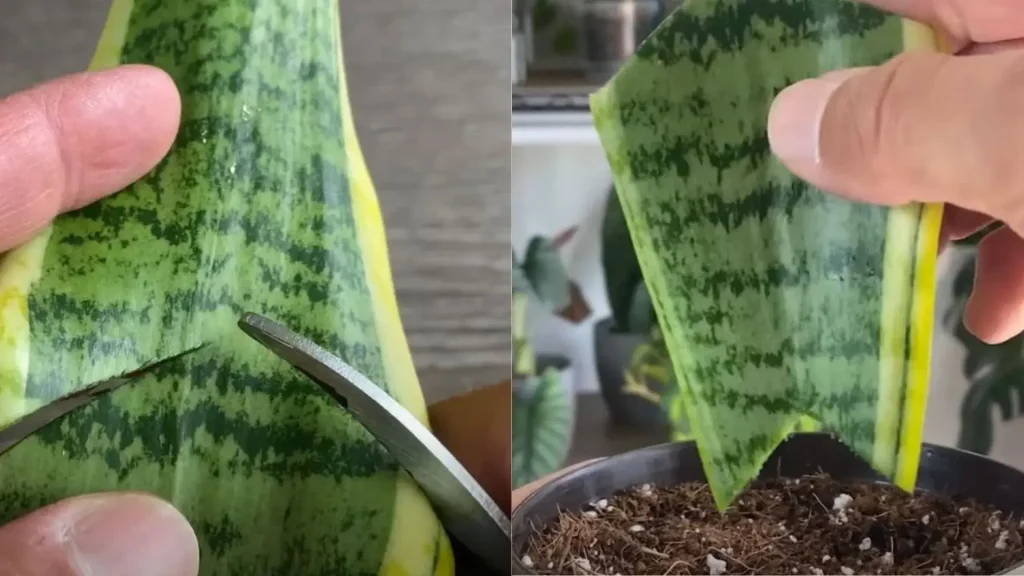
- Best Plants for Leaf Cuttings: Snake plant, African violets, begonia, and peperomia.
- Steps for Leaf Propagation:
- Choose a healthy leaf and ensure it is well-watered beforehand.
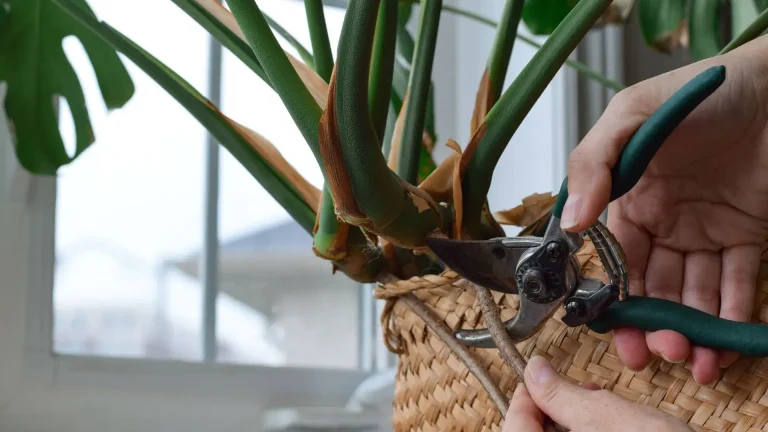
- Sterilize your pruners and make an upside-down V-cut at the base of each cutting. This helps identify which side should be planted downwards.
- For succulents, let the leaf dry for a day to prevent rot.
- Place the leaf on well-draining soil or a propagation tray.
- Mist lightly and keep in bright, indirect light until roots and new leaves form.
Division
Division involves separating a plant into smaller sections, each with its own roots and shoots. This method is ideal for plants that naturally grow in clumps.
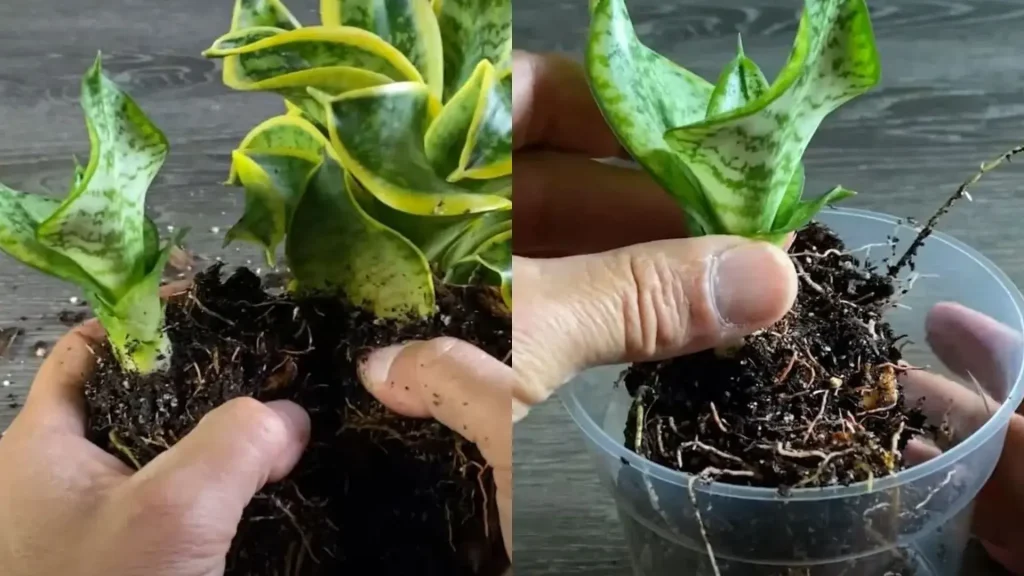
- Best Plants for Division: Peace lily, ferns, sansevieria, and calatheas.
- Steps for Division:
- Gently remove the plant from its pot.
- Use your hands or a clean knife to divide the root ball into smaller clusters.
- Repot each cluster in fresh soil, ensuring roots are covered and supported.
Air Layering
Layering encourages a part of the plant (stem or branch) to produce roots while still attached to the parent plant. Once roots develop, the new plant is separated.
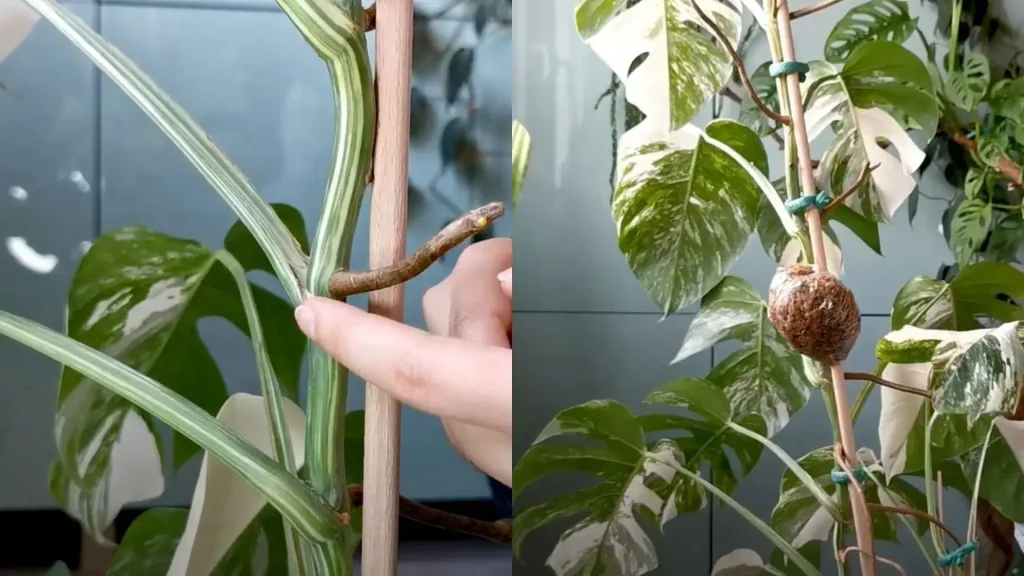
- Best Plants for Air Layering: Philodendron, monstera, and pothos.
- Steps for Air Layering:
- Choose a healthy branch and make a small incision or remove the outer bark.
- Wrap the area with damp sphagnum moss and secure it with plastic wrap.
- Monitor for root growth through the moss over several weeks.
- Once roots form, cut the branch below the new growth and pot it.
Offsets and Pups
Offsets, or “pups,” are natural offshoots produced by the parent plant. These can be gently removed and replanted as independent plants.
- Best Plants for Offsets: Spider plant, aloe vera, bromeliads, and succulents.
- Steps for Offsets:
- Wait until the pup is large enough to handle (typically when it has its own roots).
- Gently detach it from the parent plant using your hands or a clean knife.
- Pot the offset in a suitable medium and provide the same care as the parent plant.
Seed Propagation
While slower, growing plants from seeds is a rewarding method, especially for rare species.
- Steps for Seed Propagation:
- Collect seeds from mature plants or purchase high-quality seeds.
- Sow seeds in a suitable medium, following the depth and spacing instructions for the species.
- Keep the soil consistently moist and place the container in a warm, bright area.
Tools and Materials Needed
Having the right tools and materials on hand can significantly improve your chances of successful propagation. These essentials ensure clean cuts, proper rooting environments, and optimal care for your new plants.
Basic Tools
- Pruning Shears or Scissors: Sharp, clean tools for making precise cuts without damaging the plant.
- Sterilizing Supplies: Rubbing alcohol or bleach solution to sterilize tools before and after use to prevent infection.
- Propagation Containers: Glass jars, small pots, or propagation trays for holding cuttings.
Propagation Mediums
- Water: A simple and effective method for rooting many plants, such as pothos and philodendrons.
- Soil: Use a well-draining potting mix suitable for the plant type. For succulents, a cactus mix works best.
- Sphagnum Moss: Ideal for air layering or rooting moisture-loving plants.
- Perlite or Vermiculite: Lightweight mediums for promoting aeration and root growth.
Additional Supplies
- Rooting Hormone: Encourages root growth, especially for difficult-to-propagate plants. Available in powder or gel form.
- Humidity Domes or Plastic Bags: Maintain moisture levels for cuttings that need high humidity.
- Moisture Meter: Helps monitor soil moisture to prevent overwatering.
- Labels and Markers: Keep track of plant types and propagation dates.
- Spray Bottle: For misting soil or leaves, particularly useful in maintaining humidity.
Step-by-Step Guide for Successful Propagation

Step 1: Preparing the Parent Plant
- Select a healthy, mature plant free of pests or diseases.
- Water the plant a day before taking cuttings to ensure it’s hydrated.
Step 2: Cutting and Preparing Propagules
- Identify a healthy stem or leaf for cutting. For stems, ensure at least one node is included.
- Use sterilized tools to make clean cuts. Avoid jagged edges, as they can hinder rooting.
- For leaf or stem cuttings, remove any lower leaves that may sit in water or soil.
Step 3: Rooting the Cutting
- Water Method: Place the cutting in a jar of clean water, ensuring the node is submerged. Change the water every few days to prevent stagnation.
- Soil Method: Insert the cutting into moist, well-draining soil. Keep the soil consistently damp but not soggy.
- Humidity Method: Cover the cutting with a plastic bag or place it in a propagation chamber to maintain moisture.
Step 4: Monitoring Growth
- Place the cuttings in bright, indirect light to encourage rooting.
- Check regularly for root development. For water propagation, roots typically appear within 1-4 weeks.
- Avoid disturbing the cutting during this delicate stage.
Step 5: Potting and Caring for New Plants
- Once roots are 2-3 inches long, transfer the cutting into a pot with fresh soil.
- Water the plant lightly and adjust care based on its specific needs.
- Gradually acclimate the new plant to normal humidity and light levels to avoid stress.
Environmental Factors for Successful Propagation
Light
- Bright, indirect light is ideal for most cuttings. Direct sunlight can scorch young plants.
- Use grow lights for consistent illumination in low-light areas.
Temperature
- Maintain a warm environment, ideally between 65-75°F (18-24°C). Avoid drafts or sudden temperature fluctuations.
Humidity
- High humidity helps cuttings retain moisture and develop roots. Use humidity trays, misting, or plastic coverings to maintain moisture levels.
Soil and Water Quality
- Use well-draining soil to prevent root rot.
- For water propagation, use filtered or distilled water to avoid chlorine and mineral buildup.
Common Challenges and Troubleshooting Tips
Propagation is a rewarding process, but it’s not without challenges. Here are common issues you might encounter and how to address them.
1. Cuttings Not Rooting
- Possible Causes:
- Cutting lacks a node or healthy tissue.
- Incorrect propagation environment (e.g., too much light, low humidity).
- Using water with high chlorine or other contaminants.
- Solutions:
- Ensure your cutting has a node and fresh, healthy growth.
- Adjust environmental conditions, such as increasing humidity or moving the cutting to indirect light.
- Use filtered or distilled water for water propagation.
2. Root Rot
- Possible Causes:
- Overwatering or waterlogged soil.
- Lack of drainage in the propagation container.
- Solutions:
- Remove affected roots, cutting back to healthy, firm tissue.
- Repot the cutting in fresh, well-draining soil.
- Ensure containers have drainage holes.
3. Leaves Wilting or Drooping
- Possible Causes:
- Low humidity or excessive heat.
- Overhandling or disturbing the cutting.
- Solutions:
- Use a humidity dome or mist the leaves to increase moisture.
- Minimize movement or handling of the cutting during the rooting phase.
4. Fungal Growth or Mold
- Possible Causes:
- Poor air circulation.
- Excessive moisture or soggy propagation medium.
- Solutions:
- Increase air circulation by using a fan or removing plastic coverings periodically.
- Sterilize propagation materials and use clean tools.
5. Pests on Cuttings
- Possible Causes:
- Infested parent plant.
- Humid environments attracting pests like fungus gnats.
- Solutions:
- Inspect parent plants thoroughly before taking cuttings.
- Use neem oil or insecticidal soap to treat pests.
6. Slow Root Growth
- Possible Causes:
- Propagating during the plant’s dormant season.
- Poor lighting conditions.
- Solutions:
- Propagate during the active growing season (spring or summer).
- Provide bright, indirect light or use grow lights.
Creative Uses for Propagated Plants
Propagation isn’t just practical—it’s a fun way to get creative:
- Gift Ideas: Share rooted cuttings as thoughtful, sustainable gifts.
- Home Décor: Use propagation stations as living décor for windowsills or shelves.
- Propagation Swaps: Participate in local or online plant exchanges to diversify your collection.
- Mini Gardens: Create terrariums or group small propagated plants for unique arrangements.
Final Thoughts
Propagation offers a creative, budget-friendly way to grow your houseplant collection. By mastering different techniques like cuttings, division, offsets, layering, and seed sowing, you can experiment with various plants and refine your skills.
Remember, propagation is a learning process—don’t hesitate to try different methods and seek advice from plant communities. Happy propagating!